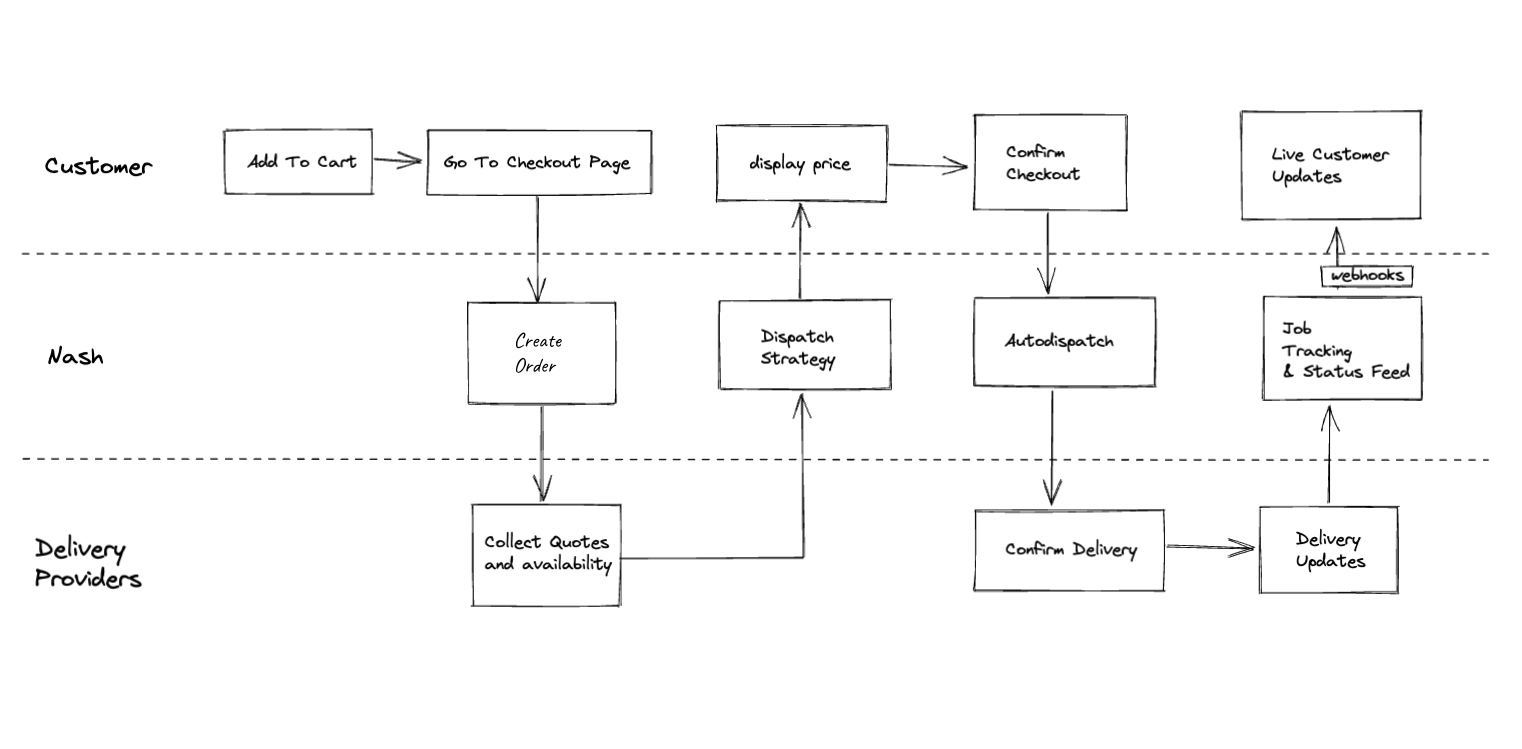
Nom Nom Goods as an example, following our customer Sammy through the process.
Introduction
Imagine you built a business and app calledNom Nom Goods. Nom Nom Goods manages hundreds of stores across the country and is eager to leverage Nash for orchestrating deliveries.
The Typical Customer Experience
Here’s what Sammy’s experience looks like in theNom Nom app:
- 🍩 Sammy adds items to his cart and selects a nearby store location.
- 🧾 At checkout, he chooses to have his order delivered immediately.
- 🚚 Nash is integrated into the checkout flow to provide delivery quotes and manage the delivery process.
- 👍 Sammy receives his orders quickly and reliably, along with status updates about his delivery.
Integration with Nash on Checkout
To integrate Nash into yourNom Nom Goods checkout flow, you’ll follow these steps:
- Build the Dispatch Strategy: Configure how Nash selects the best delivery provider for each order.
- Set up Automations: Automatically apply the appropriate Dispatch Strategy based on predefined rules.
- Create an Order: When Sammy completes checkout, create a new order in Nash for delivery coverage and pricing.
- Autodispatch the Order: After Sammy places his order, Use Nash’s autodispatch feature.
- Track the Delivery: Use live updates from Nash to keep Sammy informed about his order status.

1. Building the Dispatch Strategy
Dispatch Strategies are configurations that determine how Nash selects delivery providers for your orders. You may prefer selecting the lowest-cost provider or have a ranked list of providers. To create a Dispatch Strategy, you can use either the Nash API or the Nash Portal. Below is an example of using the API to create a Dispatch Strategy with the following configuration:- Allowed Providers:
NomNomDrive,HotRodWheels,FastFleet - Provider Selection Strategy:
lowest_price(This indicates that Nash will choose the provider with the lowest delivery cost.) - Reassign on Failure:
true(Nash will seek an alternative provider if the first choice cannot fulfill the order.) - Auto Dispatch:
false(Indicate that we will manually manage the autodispatch of orders.)
create dispatch strategy
2. Setting Up Automations
Automations allow you to apply Dispatch Strategies to your orders based on predefined rules, such as package value or delivery location. This ensures the correct Dispatch Strategy applies without manual intervention. You can configure Automations in the Nash Portal. For example, create a rule that applies the “NomNomCheckoutStrategy” Dispatch Strategy to any order with a package value over $50. This helps ensure that higher-value deliveries receive appropriate treatment.3. Creating an Order
When customer Sammy completes checkout in yourNom Nom Goods app, you’ll create a new order in Nash using the /v1/order endpoint. The order payload should include details such as:
- Pickup address
- Dropoff address
- Package description
- Package value
- Any special instructions
payload for creating an order
quote list in create order response
refresh order quotes
Nom Nom app. Since Nom Nom already created the order with the appropriate details in Nash, the only thing left is to autodispatch!
4. Autodispatching the Order
Once you have reviewed the quotes, you can leverage Nash’s autodispatch feature to assign the delivery automatically to the best provider based on your Dispatch Strategy. To initiate the autodispatch process, you will call the/v1/order/{id}/autodispatch endpoint.
Here’s an example of how to autodispatch an order:
autodispatch order
winnerQuote object has the quote ID.
autodispatch response - winner quote
delivery object indicates the delivery is active.
autodispatch response - delivery object